Onboarding Guide
From your first sign-in to your first cost recommendation — in under 30 minutes.
This guide mirrors the Setup guide inside the Zation FinOps Platform at platform.zation.io → Settings → Tenants. You can follow either — both result in the same App Registration and role assignments.
Prerequisites
Before you start, make sure you have:
- An active Microsoft Entra ID tenant
- A Global Administrator account for the initial App Registration and admin consent
- For Azure FinOps: Owner or User Access Administrator on the Tenant Root Group (Management Group)
- For Microsoft 365 FinOps: a Microsoft 365 tenant connected to the same Entra ID
- About 15–20 minutes to walk through the Azure Portal steps
The setup itself needs elevated rights (Global Administrator, Owner on the Management Group). Once setup is complete, the Zation Platform only holds read-only permissions on the assigned scopes. See Permissions for the full list.
Step 1 — Sign in to the Platform
Open platform.zation.io and click Sign in with Microsoft. On first sign-in from your tenant, Microsoft shows the consent screen for the Zation Platform multi-tenant app:
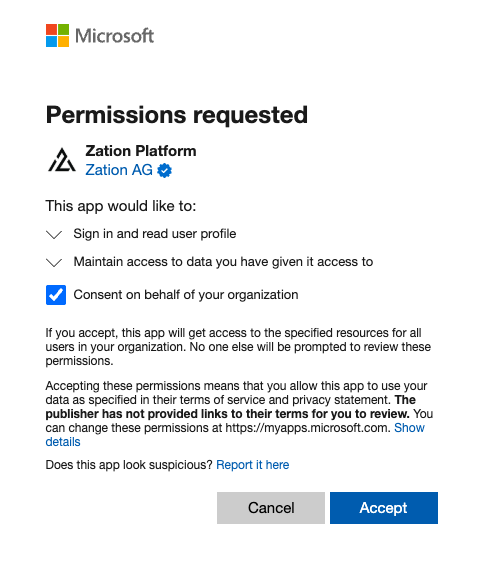
A Global Administrator grants tenant-wide consent once: tick Consent on behalf of your organization, then click Accept. This registers the Zation Enterprise application for the whole tenant — afterwards regular accounts sign in without re-consenting. The admin doesn't need their own Platform account; they can open platform.zation.io solely to grant this consent.
After accepting, the Platform automatically opens the Onboarding Wizard:
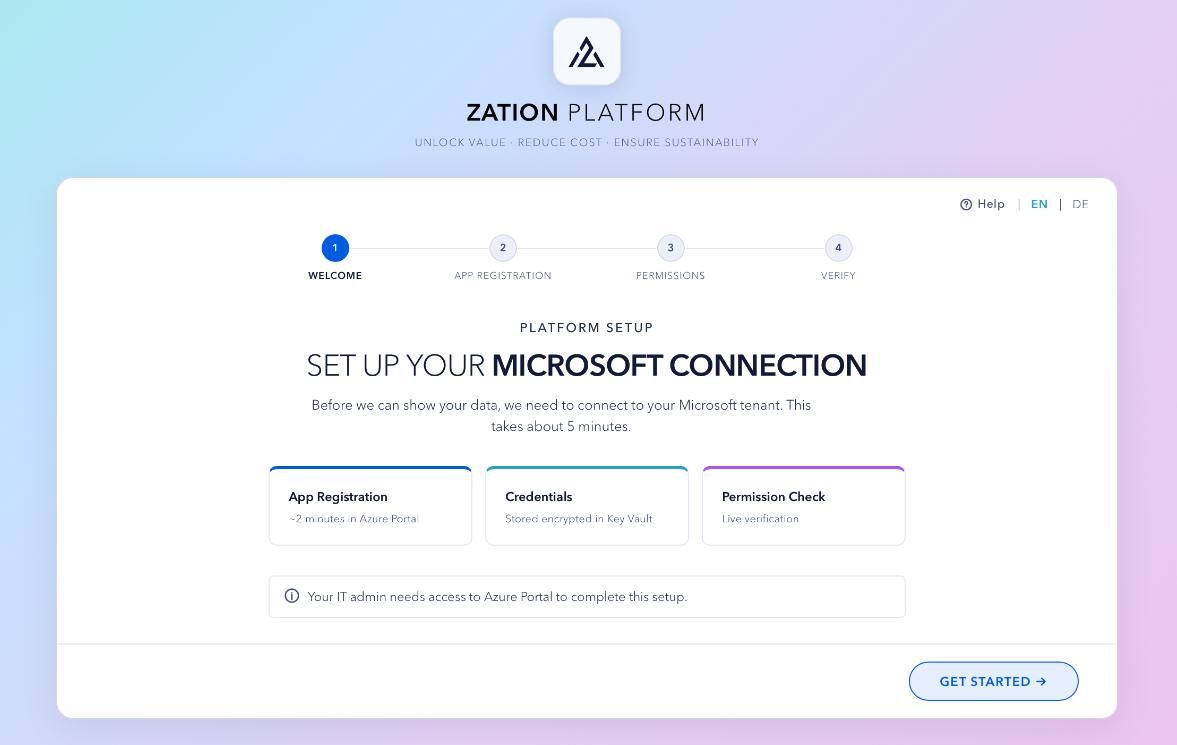
The wizard walks you through the four steps below: App Registration → Permissions → Verify. Click Get started to begin Step 2.
Step 2 — Create the App Registration
In this step you create a dedicated App Registration that the Zation Platform uses to read your data.
- In the Azure Portal, open Microsoft Entra ID → App registrations → + New registration.
- Configure the registration:
- Name:
Zation Platform Connector - Supported account types: Single tenant
- Redirect URI: leave empty
- Name:
- Click Register.
- From the Overview page, copy the Directory (tenant) ID and Application (client) ID, and paste them into the Setup guide form in the Platform.
- Open Certificates & secrets → + New client secret:
- Description:
Zation Platform - Expires:
24 months(recommended)
- Description:
- Click Add, then copy the secret value immediately and paste it into the Setup guide.
The client secret value is visible only at creation time. If you navigate away before copying it, you'll need to create a new secret.
Step 3 — Grant Microsoft Graph permissions
Skip this step if you don't plan to use the Microsoft 365 module. You can return to it later.
-
Inside the Zation Platform Connector App Registration, open API permissions → + Add a permission → Microsoft Graph → Application permissions.
-
Add the following permissions:
Permission Used for Directory.Read.AllTenant directory, group memberships, tenant-level licensing facts User.Read.AllLicense assignments per user Reports.Read.AllMicrosoft 365 usage reports (Adoption module) AuditLog.Read.AllSign-in activity for the Adoption module, plus MFA registration state for the Security tile DeviceManagementManagedDevices.Read.AllIntune-managed devices DeviceManagementApps.Read.AllIntune app-protection (MAM) registrations — mobile-only detection for BYOD tenants (optional) TeamsUserConfiguration.Read.AllTeams user configuration CallRecords.Read.AllTeams call quality and usage metrics -
Click Grant admin consent for <Tenant> → Yes.
Without admin consent, the permissions appear as Not granted and the Microsoft 365 sync will fail with Insufficient privileges. Granting consent requires a Global Administrator or Privileged Role Administrator.
Step 4 — Enable audit-based usage signals — Dynamics 365, Copilot & Power BI (optional)
Skip this step if none of these apply. One permission unlocks audit-confirmed usage signals for three areas at once: the D365 seat-rightsizing pages (inactive users, module mismatches, attach candidates, and optionally licence-tier recommendations), plus richer Copilot and Power BI recommendations based on real interaction counts instead of last-activity timestamps alone.
Grant the activity permission
This audit evidence comes from the Office 365 Management APIs — a different resource than Microsoft Graph, so it is added separately:
-
In the Zation Platform Connector App Registration, open API permissions → + Add a permission → APIs my organization uses, then search for and select Office 365 Management APIs.
-
Choose Application permissions and add:
Permission Used for ActivityFeed.ReadAudit-event metadata (which user used which app or workload, and when) driving three signal families: Dynamics 365 inactive-user/module-mismatch/attach-candidate detection, Copilot interaction-frequency evidence, and Power BI usage evidence. Metadata only; no record content, no Copilot prompt/response text. -
Click Grant admin consent for <Tenant> → Yes.
ActivityFeed.Read goes on the same Zation Platform Connector app from Step 2 — no new registration and no new secret. It is one more application permission, just on a different resource. Granting it improves all three areas together — you can't pick just one.
Turn on auditing (required)
These audit events only reach the Platform when the tenant's unified audit log is on. Dynamics 365 additionally needs per-environment auditing:
- The tenant's unified audit log — Microsoft Purview → Audit → Start recording user and admin activity. Required for all three areas (Dynamics 365, Copilot, Power BI).
- Auditing per environment — Power Platform admin center → the environment → Settings → Audit and logs → Audit settings → Start auditing. Dynamics 365 only.
If the unified audit log is off, none of the three areas get audit evidence — Dynamics 365, Copilot, and Power BI all fall back to their proxy/last-activity signals. If only a Dynamics 365 environment's own auditing is off, that environment specifically returns no events and the module reports every user there as inactive. Turn auditing on before the first sync.
Optional — licence-tier recommendations (Dynamics 365 only)
Professional / Enterprise / Premium tier recommendations need one more read-only grant inside each environment: the Zation License Reader application user and role. Optional, and addable later — see Permissions → Dynamics 365, Copilot, and Power BI.
Step 5 — Assign Azure RBAC roles
Skip this step if you don't plan to use the Azure FinOps module.
The Platform reads cost, metric, and resource data at the Management Group scope, so a single set of role assignments covers every Azure subscription in your tenant.
Roles on the Tenant Root Group
-
In the Azure Portal, open Management Groups → Tenant Root Group → Access control (IAM) → + Add role assignment.
-
Assign these built-in roles to the Zation Platform Connector service principal:
Role Purpose ReaderResource inventory, tags, diagnostic settings, utilization metrics, Log Analytics workspaces, backup vaults, and emissions data — all via its */readactionCost Management ReaderCost and usage data (required for Enterprise Agreement billing scopes, where Readeris not sufficient)
Reservations Reader and Savings plan reader
These two roles are not inherited from the Management Group, because Reservations and Savings Plans are tenant-level resources. Assign each one once at tenant scope — a single assignment covers every current and future commitment, so you never have to revisit this when new Reservations or Savings Plans are purchased.
Assigning roles at tenant scope requires Global Administrator AND Access management for Azure resources set to Yes under Microsoft Entra ID → Properties. The toggle can be reverted once the assignments are done.
Reservations Reader— Reservations → Role assignment (the button in the top toolbar). Scope:/providers/Microsoft.Capacity.Savings plan reader— Savings plans → Role assignment (top toolbar). Scope:/providers/Microsoft.BillingBenefits.

PowerShell auto-setup (recommended)
The Setup guide and Onboarding Wizard in the Platform offer a download for zation-rbac-setup.ps1 that assigns both Management Group roles (Reader and Cost Management Reader) plus the two tenant-scope roles (Reservations Reader and Savings plan reader) in one run.
# Requires: Owner or User Access Administrator on the Tenant Root Group, plus
#           elevated access (Global Admin) for the two tenant-scope roles
# Module:   Install-Module Az -Scope CurrentUser
.\zation-rbac-setup.ps1
The script prompts for the Tenant Root Group name and uses the Client ID from your App Registration. RBAC propagation can take up to 30 minutes.
Step 6 — Verify and first sync
Back in the Platform, click Verify in the Setup guide. The Platform validates the App Registration, the granted Graph permissions, and the RBAC assignments.
When verification succeeds, the initial data sync starts automatically. Depending on the size of your environment this takes 5–20 minutes. You can continue using the Platform in the meantime — recommendations appear as soon as enough data is available.
Troubleshooting
| Symptom | Likely cause | Fix |
|---|---|---|
Verify returns AADSTS70011 | Wrong tenant signed in to Azure Portal | Sign in to the Portal with an account from the customer tenant before running the steps |
| Graph permissions stay Not granted | Admin consent step skipped | Open the App Registration, then API permissions → Grant admin consent for <Tenant> |
| Azure RBAC assignment fails at tenant scope (Reservations / Savings Plans) | Access management for Azure resources toggle is off | Set the toggle to Yes under Microsoft Entra ID → Properties, retry, then revert |
| Sync stays at 0% after 30 minutes | RBAC propagation still in progress | Wait up to 30 minutes; re-run Verify afterwards |
Insufficient privileges on first M365 sync | Graph permission missing or not consented | Re-check the table in Step 3 |
Next steps
- Permissions — full reference of every role and scope Zation uses
- FAQ — common questions from new customers
Did this help? Send feedback to info@zation.io.